
Look for the Force Message App in the App Launcher.
As a Force Message Admin User: It has full access.
As a Force Message Power User:
a. Make sure it has read access only. It can’t create, edit, or delete anything in the org unless the admin gives access to do so. But it has read and edit access only to message channel users.
b. Tabs: Accounts, Bulk UI, Cases, Campaigns, Messages, Message Channel, Message Template, Message Channel Users, Opportunities.
As a Force Message Normal User:
- Make sure it is read access only. It can’t create, edit, or delete anything in the org unless the admin gives access to do so.
Tabs: Accounts, Bulk UI, Cases, Campaigns, Messages, Message Channel, Message Template, Message Channel Users, Opportunities.
1. Log in as Admin/Power/Normal User.
- Create Simple Contact Records
Create a new contact by following the steps: Contacts – new – Fill the LastName field and save.
If Admin wants to send and receive the messages through the chat UI component, then follow the steps:
1. Click the Contacts tab, click New, and make sure all these below fields are filled before saving.
a. contact phone != (not equal to) null, +911234567890 (it must have + and country code like 91)
b. consent to contact != (not equal to) null (the message sends on contact creation date irrespective of the date given in the consent to contact field)
c. Message Channel != (not equal to) null
d. Message Opt Out = (equal to) true (checked).
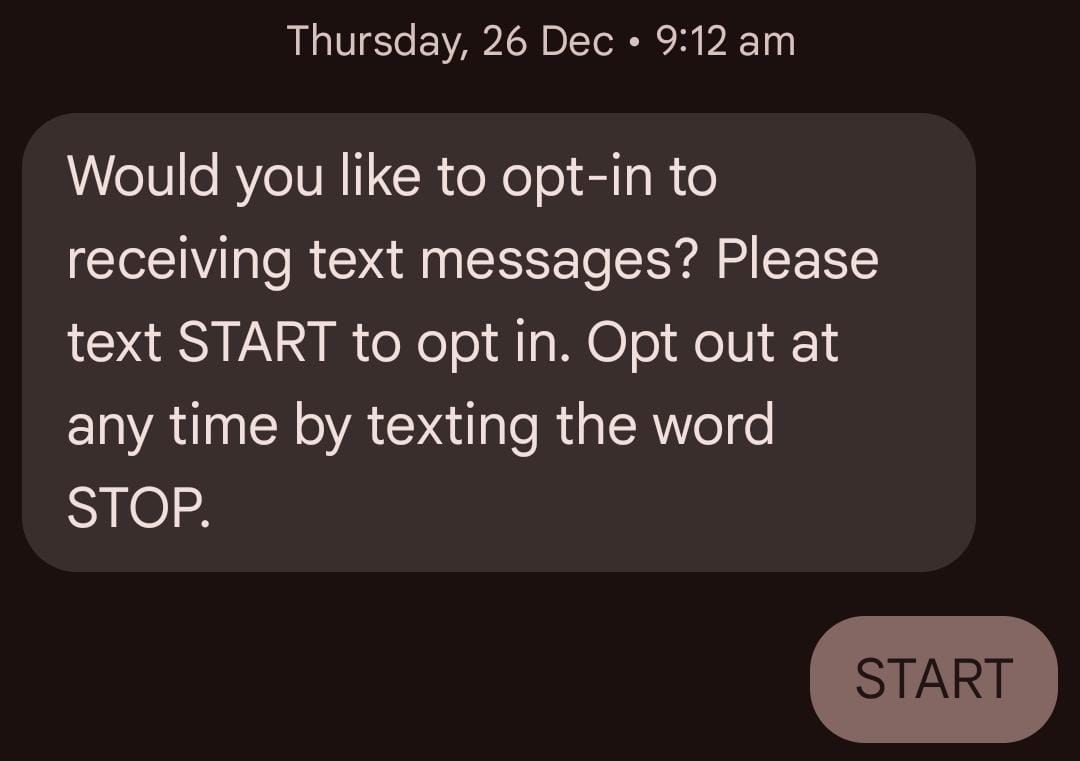
Then the default message sends to the particular contact’s phone number. If that contact wants to reply, he/she should type start/START in any case; then only can they start the conversion. Later, a period of time, if they feel they do not want to continue this conversion, they can type stop/STOP in any case. It means they can’t send any message again. If they feel like sending messages, then type start in any case, and they can start the conversion.
What can be sent by and not sent by Admin/ Power/ Normal user:
ADMIN:
As Admin/Power/Normal users can send
- Messages: Can send up to 160 characters and not more than that.
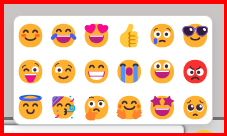
- Emojis: Can send 18 types of emojis.
3.Attachments or Text Files—can send pictures or files
Note: You can only upload one file at a time. For instance, choose and upload each file separately if you need to send five images. It does not allow multi-select functionality.
4.Merge Fields: It consists of 2 options. Select Merge Object and Select Merge Fields. A relevant field appears in the Select Merge Fields option based on the object you selected in the Select Merge Object option.If No merge value found for the selected field it displays the error message.

5.Scheduled Date and Time: You can send scheduled messages and emojis on a particular date and time by selecting this option
NOTE:
1. In the date field, select current or future dates, not the previous dates.
2.Choose the present or future timings that are shown in the Time box. You can also alter the timings, but not the earlier timings.
From Date: It should be current or previous dates but not future dates.
Error Message :

To Date: It should be previous dates or future dates.
Error Message :

6.Templates: Open the chat UI component. Click on the “Template” option in the chatbox. Select a previously created template name. When a template is selected, its content is populated in the chatbox. Admin/power/normal users can edit the pre-filled content as required.
NOTE : While creating templates make sure message text should not be greater than 126 characters
NOTE: New templates can be created and saved successfully under the “Message Templates” tab.
7.AI Assist: Type a message in the chatbox. Click the AI Assist button. Verify a popup opens, and the text from the chatbox populates into the AI Assist textbox. Click the PROCESS AI button. Observe the response generated under AI RESPONSE. Click the displayed response, and verify it populates directly into the chatbox.Alternatively, click the AI Assist button without text in the chatbox. Type a query in the popup What can I help with? textbox.Click the PROCESS AI button.Verify the response generated and its ability to populate into the chatbox when clicked.
8.Select a Channel: When you select a channel, only the users who are assigned to that channel will see the channel or list of channels.The user cannot send messages without choosing the channel; if they do, an error message is displayed.

9.Color settings: In this option we can see text color, chat background color, chat color, contact bubble color, and header color, and in additional settings we have the AI suggestions option.

- Text color: To alter the color of the text in the Chat UI component. Choose the Text Color option in the settings. To view the hexadecimal color palette, click on the dropdown menu. From the palette, choose the necessary color. Click “Save.” Clicking Save should instantly alter it to the chosen color.
- Chat Background color: To alter the color of the background in the Chat UI component. Choose the Chat Background Color option in the settings. To view the hexadecimal color palette, click on the dropdown menu. From the palette, choose the necessary color. Click “Save.” Clicking Save should instantly alter it to the chosen color.
- Chat color: To alter the color of the chat color in the Chat UI component. Choose the Chat Color option in the settings. To view the hexadecimal color palette, click on the dropdown menu. From the palette, choose the necessary color. Click “Save.” Clicking Save should instantly alter it to the chosen color.
NOTE: The color of outbound message chats changes to the selected color. The color of incoming messages remains unaffected. - Contact Bubble color: To alter the Contact Bubble color in the Chat UI component. Choose the Contact Bubble color option in the settings. To view the hexadecimal color palette, click on the dropdown menu. From the palette, choose the necessary color. Click “Save.” Clicking Save should instantly alter it to the chosen color.
NOTE: The color of contact bubbles for incoming messages changes to the selected color. The color of users bubbles for outbound messages remains unaffected. - Header Color: To alter the header color in the chat UI component. Choose the header color option in the settings. To view the hexadecimal color palette, click on the dropdown menu. From the palette, choose the necessary color. Click “Save.” Clicking Save should instantly alter it to the chosen color.
The Force Message chat header color and color settings background color change to the selected color.
Additional settings
a. AI Suggestions: Navigate to the Chat UI component.Go to Settings.Under Additional Settings, enable AI Suggestions.Save the settings.Observe incoming messages.Disable AI Suggestions from the Settings.Save the settings again.When AI suggestions are enabled, the system should show AI-generated suggestions for the incoming messages. When AI suggestions are disabled, no AI-generated suggestions should appear for incoming messages.
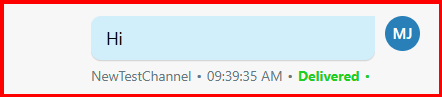
10.In Force Message Chat UI Component Incoming and outbound messages display the channel name, timing in HH:mm:ss AM/PM format, and delivery status.
11. In Force Message Chat UI Component Incoming and outbound messages display the icons.
Incoming Messages : The incoming message icon displays the initials of the contact’s FirstName and LastName.
Outbound Messages : The outbound message icon displays the initials of the user’s FirstName and LastName.


Leave a Reply